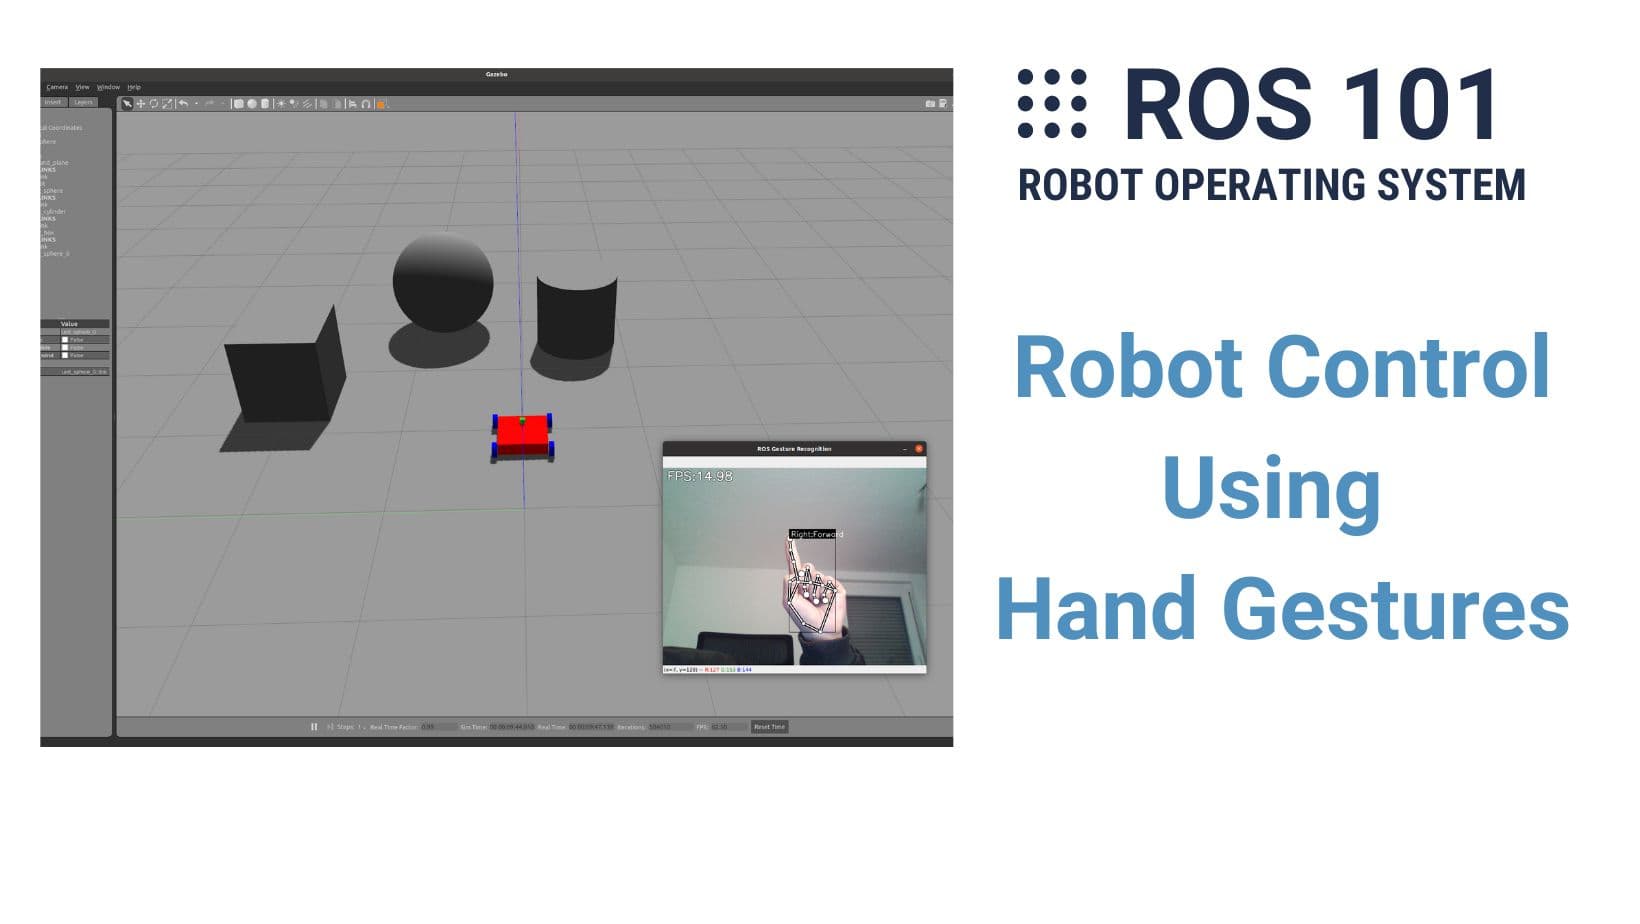
12. Robot Control Using Hand Gestures
In this final chapter of the series ROS 101, we are going to combine everything we have learned so far to finish one last challenge: moving the robot with our hand signs.
The idea
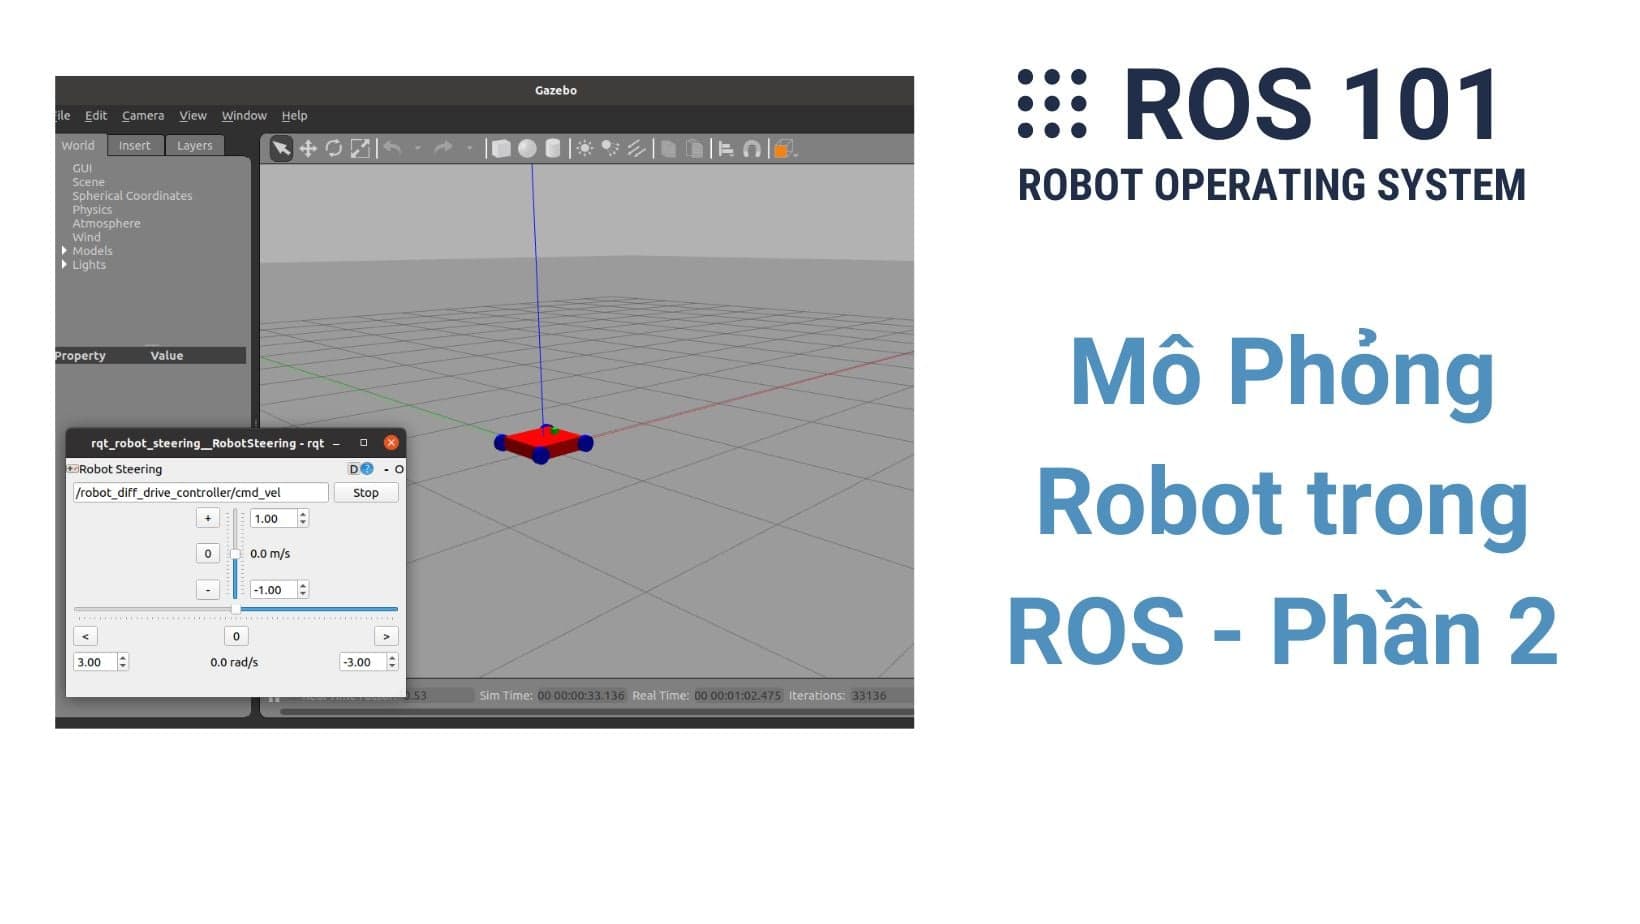
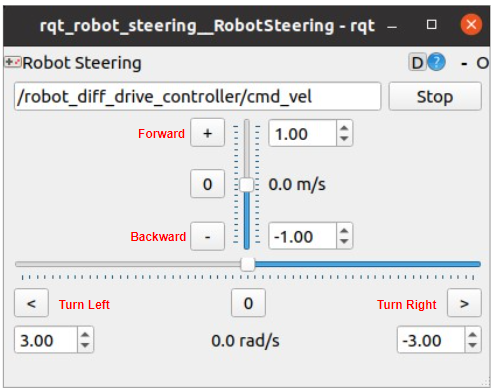
The idea is pretty simple and there is actually nothing new. In the previous chapter, we used rqt_robot_steering, a simple GUI that ROS provides to drive mobile robots. It basically lets you change the linear velocity (the vertical slider) to move forward/backward and the angular velocity (the horizontal slider) to turn left/right. These velocity values are then packed into a Twist message and published to the topic in the box, here is /robot_diff_drive_controller/cmd_vel.
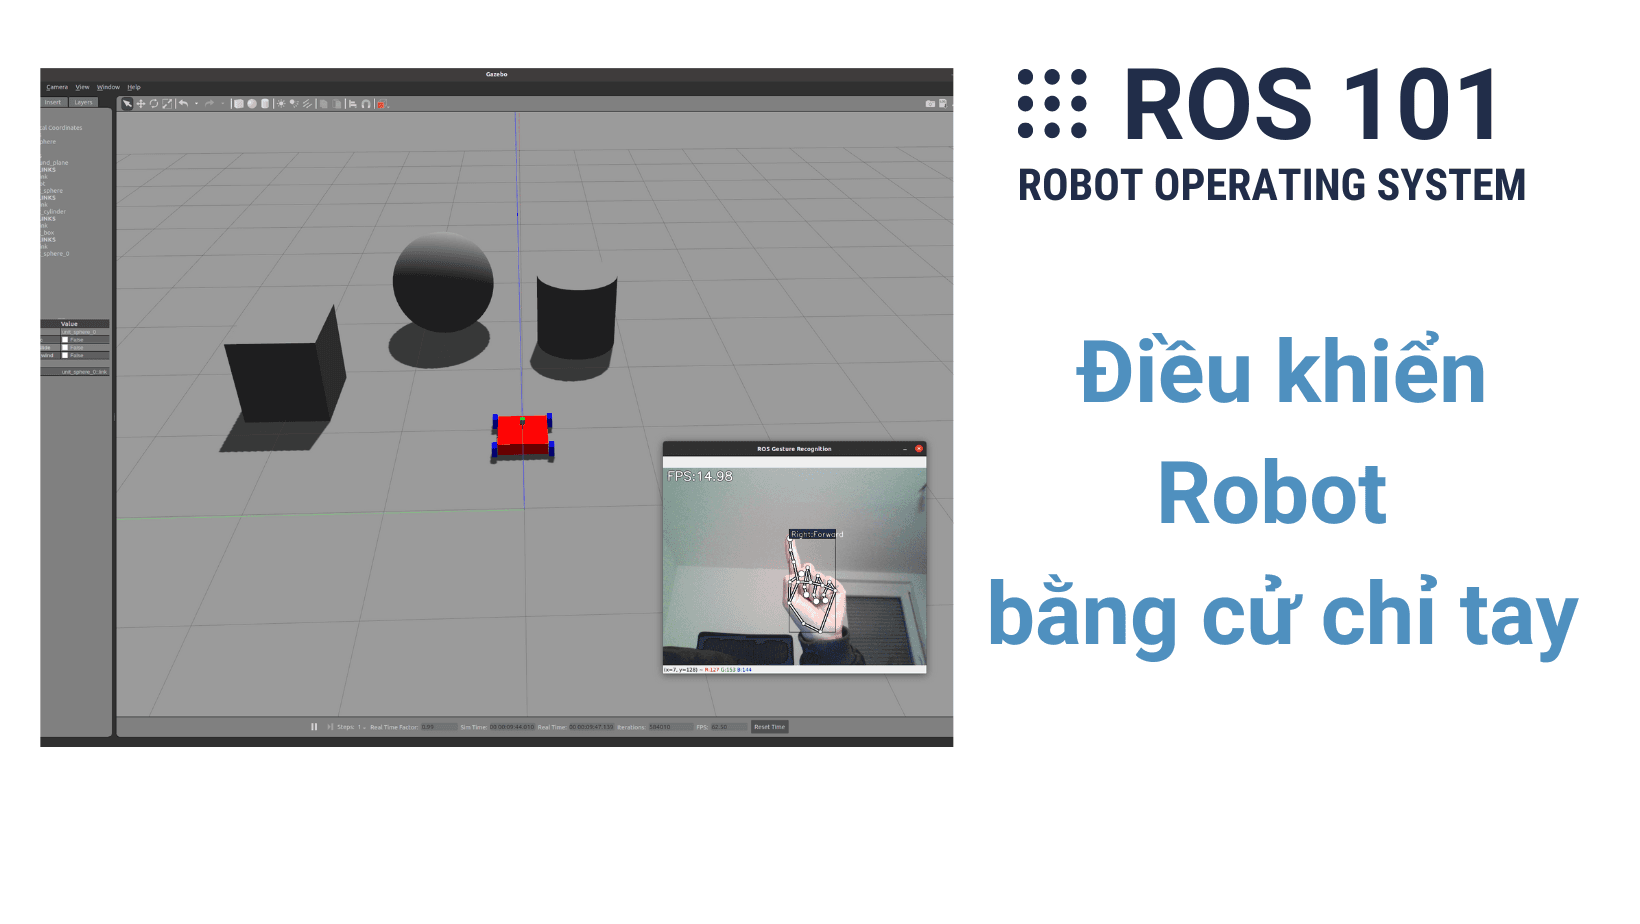
Now instead of using this GUI, we can convert the hand signs detection (from chapter 9) to have the same functionalities. The index finger pointing up/down is for moving forward/backward, the thumb is for turning left/right, and all fingers stretched means stop. All we need is to write a script to convert these signs to velocity commands and publish them as messages to the topic /robot_diff_drive_controller/cmd_vel.

If you want to change, add, or remove signs, please follow this section in chapter 9.
The workflow
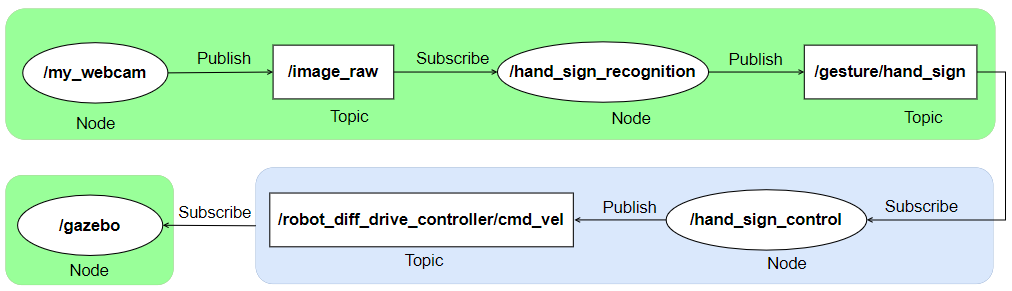
The graph below describes the workflow of the complete system (ellipses are nodes and rectangles are topics). Green parts are what we already implemented: a node /my_camera reads images from a webcam and publishes them to the topic /image_raw (from chapters 7 and 8); another Node /hand_sign_recognition subscribes to /image_raw, processes the images, and publishes results to the topic /gesture/hand_sign (from chapter 9). We need to implement the blue part which is basically a node, let's call it /hand_sign_control, that subscribes the /gesture/hand_sign topic, converts the hand signs to control values, and publishes them to the topic /robot_diff_drive_controller/cmd_vel. From this topic, the /gazebo node (from chapters 10 and 11) will read the velocity values and drive the robot accordingly.
The implementation
After getting the idea and the workflow, I believe the implementation should be quite straightforward. There are different ways to make it work and I will show you one of them. Let's create a new script named sign_to_controller.py in the folder ros_hand_gesture_recognition/src. This script will basically handle the activities in the blue part above. The source code is located here and I give below an explanation for the main parts of the code.
First, the class GestureController is created. In its __init__, the node hand_sign_control, the gesture_subscriber and the vel_publisher are initialized. The gesture_subscriber executes the function callback whenever it receives a String message from the topic /gesture/hand_sign (this topic name is defined in the launch file and is read using the function rospy.get_param). The vel_publisher will publish a Twist message to the topic /robot_diff_drive_controller/cmd_vel.
class GestureController:

    def __init__(self):
        rospy.init_node('hand_sign_control', anonymous=True)
        # Subscriber for subscribing the hand signs
        self.gesture_subcriber = rospy.Subscriber(rospy.get_param("hand_sign_recognition/publish_gesture_topic"), String, self.callback)
        # Publisher for publishing velocities
        self.vel_publisher = rospy.Publisher("/robot_diff_drive_controller/cmd_vel", Twist, queue_size=10)
        # Velocity message
        self.vel_msg = Twist()
        # Velocity in/decrements
        self.linear_vel = 0.01 #[m/s]
        self.angular_vel = 0.1 #[rad/s]
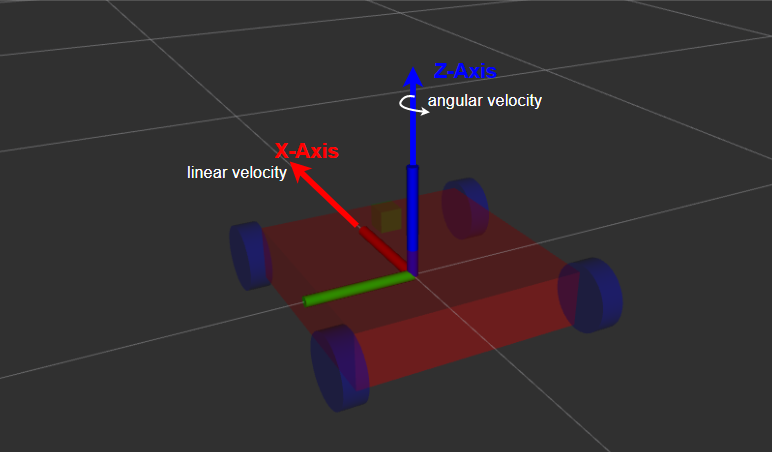
Twist, one type of ROS geometries messages, expresses velocity in free space broken into its linear and angular parts. Each part is one vector with 3 components: x, y, and z of type float. In our case, the robot is controlled by two values: the linear velocity along the X-axis for translation and the angular velocity along the Z-axis for rotation, so only the x element in the linear and the z element in the angular are the control signals. They are derived in the callback function.
The callback function is where the conversion and publishing happen. It first checks what the input gesture is. If the gesture is Forward or Backward, the linear velocity represented by the x component of vel_msg.linear is incremented or decremented respectively by linear_vel which is set to 0.01 m/s in the __init__. If the gesture is Turn Right or Turn Left, the angular velocity represented by the z component of vel_msg.angular is incremented or decremented respectively by angular_vel which is set to 0.1 rad/s in the __init__. In Forward/Backward cases, this angular velocity is set to 0 to make the robot move without rotating at the same time. If the gesture is either Stop or NONE (NONE means no sign detected), the linear and angular speeds are set to zero making the robot stop. Finally, the Twist message vel_msg is published by vel_publisher.
    def callback(self, gesture):
        if gesture.data ==  "Forward":
            self.vel_msg.linear.x += self.linear_vel
            self.vel_msg.angular.z = 0.
        elif gesture.data ==  "Backward":
            self.vel_msg.linear.x -= self.linear_vel
            self.vel_msg.angular.z = 0.
        elif gesture.data == "Turn Right":
            self.vel_msg.angular.z -= self.angular_vel
        elif gesture.data == "Turn Left":
            self.vel_msg.angular.z += self.angular_vel
        elif gesture.data == "Stop" or gesture.data == "NONE" :
            self.vel_msg.linear.x = 0
            self.vel_msg.angular.z = 0
        self.vel_publisher.publish(self.vel_msg)
Let's launch them all!
There are 4 files required to be launched/executed: this sign_to_controller.py script, my_cam.launch from package my_cam, hand_sign.launch from package ros_hand_gesture_recognition and drive_robot.launch from package ros_mobile_robot. In order to save time, you can group the first 3 in one launch file using the include tag. Let's call this file sign_control.launch and put it in the launch folder of ros_hand_gesture_recognition. Following is its content.
<launch>
    <include file="$(find my_cam)/launch/my_cam.launch" />
    <include file="$(find ros_hand_gesture_recognition)/launch/hand_sign.launch" />

    <arg name="publish_gesture_topic" default="/gesture/hand_sign"/>
    <arg name="control_topic" default="/robot_diff_drive_controller/cmd_vel"/>

    <node name="sign_to_controller" pkg="ros_hand_gesture_recognition" type="sign_to_controller.py" output="screen">
        <param name="publish_gesture_topic" type="string" value="$(arg publish_gesture_topic)" />
        <param name="control_topic" type="string" value="$(arg control_topic)" />
    </node>
</launch>
Now open 2 terminals. In the first one run:
roslaunch ros_hand_gesture_recognition sign_control.launch
In the second:
roslaunch ros_mobile_robot drive_robot.launch
After that, you can drive the robot using your hand. To make it more fun, you can add some obstacles with some boxes, cylinders and spheres in Gazebo as I did here:

This video shows you how it works:
I hope you enjoy it!
Now what?
You have done a really great job finishing this series. Now you've got to know all the basics of ROS and even created your very first ROS application. From this point on you can, depending on your interests, start to explore other aspects and many awesome packages in ROS. I will put some links below for reference but there are many more out there that I am not aware of. Feel free to leave me a comment if you find any interesting ones. I plan to make more blog posts about making real robots, ROS2, AI, etc. here in Robodev, so remember to subscribe to get updated. Finally, I wish you keep having fun making robots and happy learning!
Resources:
Awesome robotic repositories on GitHub:
DIY Making real mobile robots: