0. Mobile Robot Project Log
As said in the previous post, I will not wait until the robot is complete and then make tutorials. This project log contains all the newest updates (ideas, changes, problems, etc.) that I encounter during this project from the start to the end. As always, I really appreciate any ideas or comments from you to improve the project, so don't hesitate to let me know.
16 April 2023 - Hardware Order
Today, I received all the main components that I ordered last week. Most of them are shown in the photo below. The most expensive one is the Raspberry Pi, then comes the Lidar and motors.
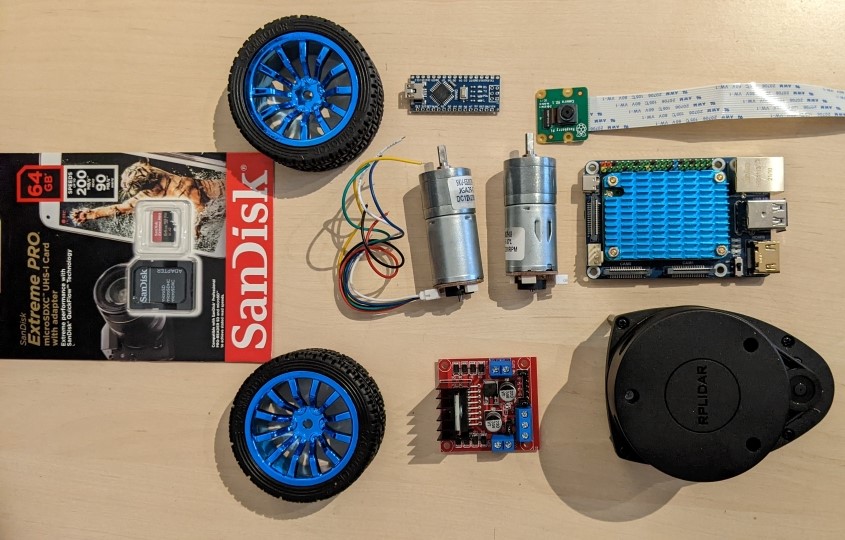
I bought them from different sites (Ebay, Amazon, etc.) and more details can be found in the table below (to be updated).
I already tried to use popular devices that hopefully, you can easily find and buy too. But for those of you who don't have a big budget, I will also leave my recommendation in the section where I test each of them. Can't wait to test them out!
18 April 2023 - Install ROS 2
I installed Ubuntu 22 and ROS 2 Humble on my laptop (and later on the Raspberry Pi too). This is the first time I use ROS 2 so it's a bit bewildering because there are many changes.

For the differences between ROS 2 and ROS 1, you can easily ask Google or ChatGPT or here but some of my first impressions after going through some tutorials are:
ROS 2 uses a new build system called
amentinstead ofcatkin.amentprovides a number of advantages overcatkin, including better support for cross-compiling, more flexible package structures, and better support for non-C++ languages like Python, bla bla bla. The underlying building concept is still similar between the two. ROS 2 provides a build tool namedcolconthat can build packages of multiple build systems (python, cmake, ament_cmake, ament_python, catkin...). So now instead of doingcatkin build, we need to usecolcon build.No
roscoreneeded! One of the main changes in ROS 2 is the use of DDS (Data Distribution Service) as the default communication middleware. DDS provides a standard API for data communication, which allows nodes to communicate with each other directly, without the need for a central coordinator likeroscore. In ROS 2, DDS is used for message passing, service invocation, and discovery of other nodes in the system.
19 April 2023 - Test Lidar
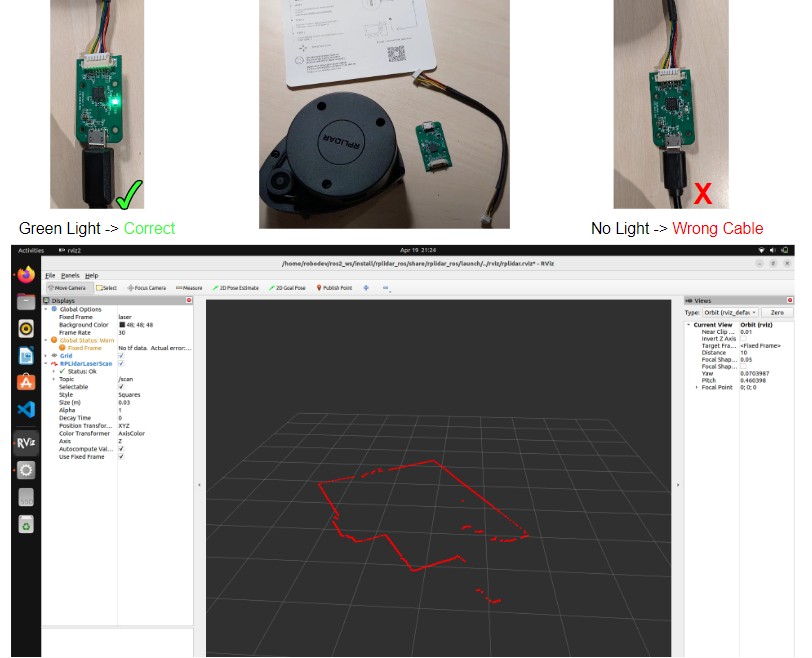
The next thing I tested is the lidar. The one I bought is a Slamtec RPLIDAR A1 which is a 2D rotating lidar. The wire connection is quite straightforward. I just followed the instruction. The only thing I don't like is that there is no Micro-USB cable delivered without which I cannot connect it to my laptop, and I find it stupid. Luckily, I have some of them. After connecting to the laptop, the lidar ran right away.
In order to view the result from the lidar, I found this repository on Github from RpLidar and cloned it to the ros workspace. However, the building ran into some error saying something like error: narrowing conversion of ‘rp::hal::Event::EVENT_TIMEOUT’ from ‘int’ to ‘long unsigned int’ [-Wnarrowing] and I don't know how to solve it.
Then I found out that I can simply run sudo apt install ros-humble-rplidar-ros to install this package for ROS2 Humble. But when I ran it, another error Error, cannot bind to the specified serial port '/dev/ttyUSB0'. I checked if the serial connection /dev/ttyUSB0 exist but it did not, so I guessed the problem may come from the cable. I tried all 3 USB cables that I have and one of them lit up the green LED from the lidar which gave me some hope, but no, the same error happened. I tried another package which was forked from the original repository above and modified for ROS Humble, but the same error. Hmm!?
The last thing I tried is to restart my laptop. And, it worked. Oh my... Now I can see the point cloud from the lidar in rviz. Yay!
01 May 2023 - Test Pi and Motor
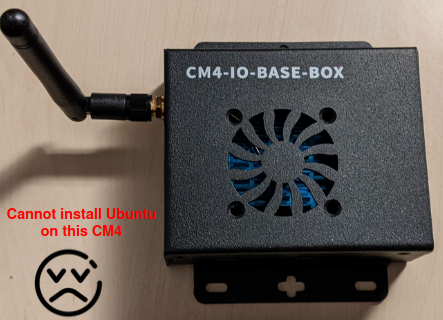
Last week, I tried to set up the Raspberry Pi and check if it works fine. However, there was a problem that at first I thought was not a big deal but turns out it was. The board that I mistakenly ordered is a Compute Module 4 (not a Raspberry Pi 4 Model B), which has 8GB RAM and an SSD of 256 GB which are more than enough for this application. It also came with a very nice metal box. I started by flashing the Ubuntu 22 image file to the SSD to install it. However, when the Ubuntu installation window appeared, I could not use my mouse and keyboard. I googled the problem a lot and tried many suggestions like here or here but nothing works. I also tried to boot from an SD Card but wasted an hour (just trying different cards, restarting the board, etc.) just to find out that this Pi version does not accept SD Card since it comes with an SSD already. So in the end, I gave up and ordered a normal Raspberry Pi 4 Model B.
In the meantime, I tested the motor directly with my laptop. This is also one tip to someone who doesn't or cannot buy a Pi, you can simply use your laptop for all the tasks in this series. The Pi is just a more compact solution and it is indeed a computer.
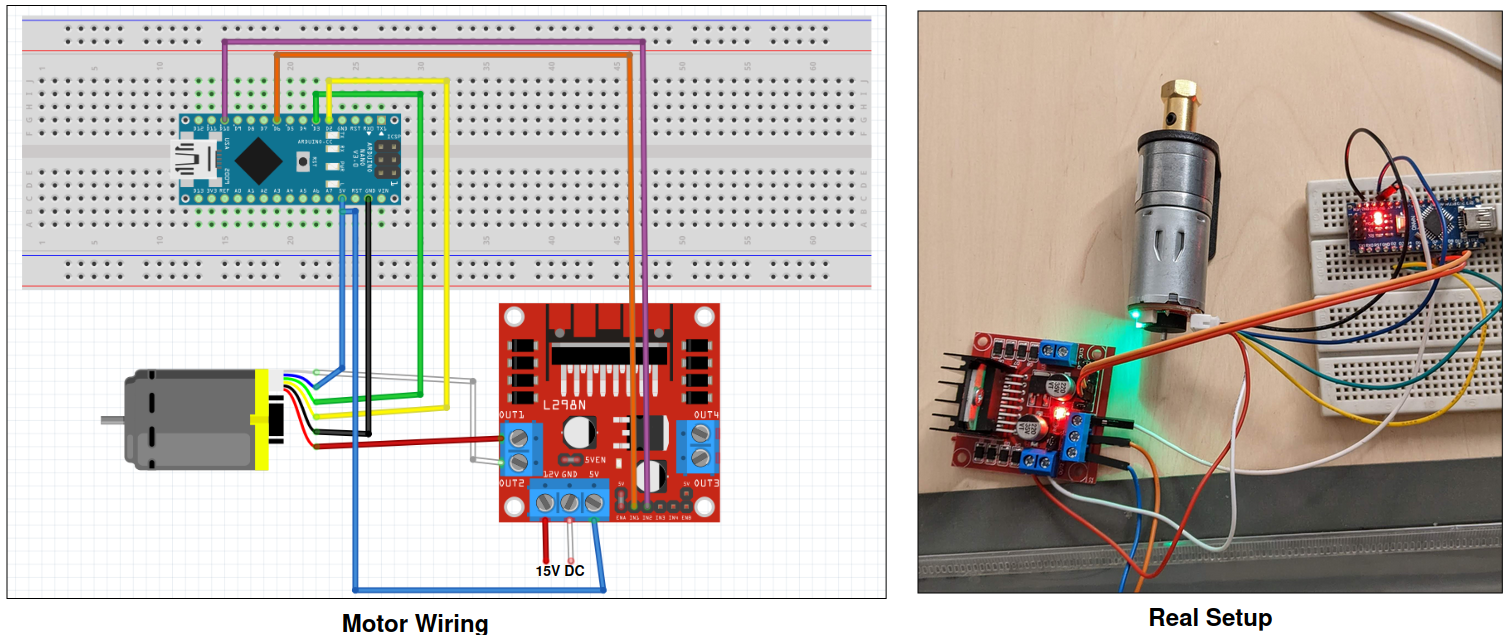
For the motor, I follow this tutorial and it worked quite nicely. I used an Arduino Nano and an L298N motor driver (a 15V adapter, which is not in the image, is connected to the motor driver). The Arduino receives signals from my computer via the serial USB connection and controls the motor. It also reads the encoder values from the motor and sends them back to the laptop for close loop control for example. The code for the Arduino is from this repo and a demo with ROS can be found here. The theory about this step will be one big chapter later in this series so I will not go into detail here.
The wiring is shown below. Note that I just tested with one motor so far but for the second it should be similar. Next, I am trying to find a way to make the chassis (or the base) of the robot. Maybe I will simply start with a box or even a wooden plate. Let's see.
14 May 2023 - Mobile Robot Prototype
First of all, sorry for such a late update. There are so many things going on in my life right now (new baby is coming, new job, finding a new flat, etc.), so it is difficult to make progress.
Install Ubuntu on a Raspberry Pi
I bought a new Raspberry Pi board (Model 4B with 8GB RAM, 4GB verson should also work) and got no problem installing Ubuntu 22. First, I uploaded the installation file (as known as OS image) to an SD card (mine is a 64GB) using an application called Raspberry Pi Imager. You can use Imager on Windows, Linux or Mac OS. After installation, open Imager and plug in the SD card. Click Choose OS > Other general-purpose OS > Ubuntu > Ubuntu Desktop 22.04.2 LTS (64bit), then click Choose storage and select the SD card. Finally, click write to start the uploading. When done, remove the SD card and plug it into the Pi. Turn on the Pi by connecting the power cable and connect it to a monitor with an HDMI cable. Follow the instruction on the screen to install Ubuntu which is pretty straightforward.
Build the first prototype
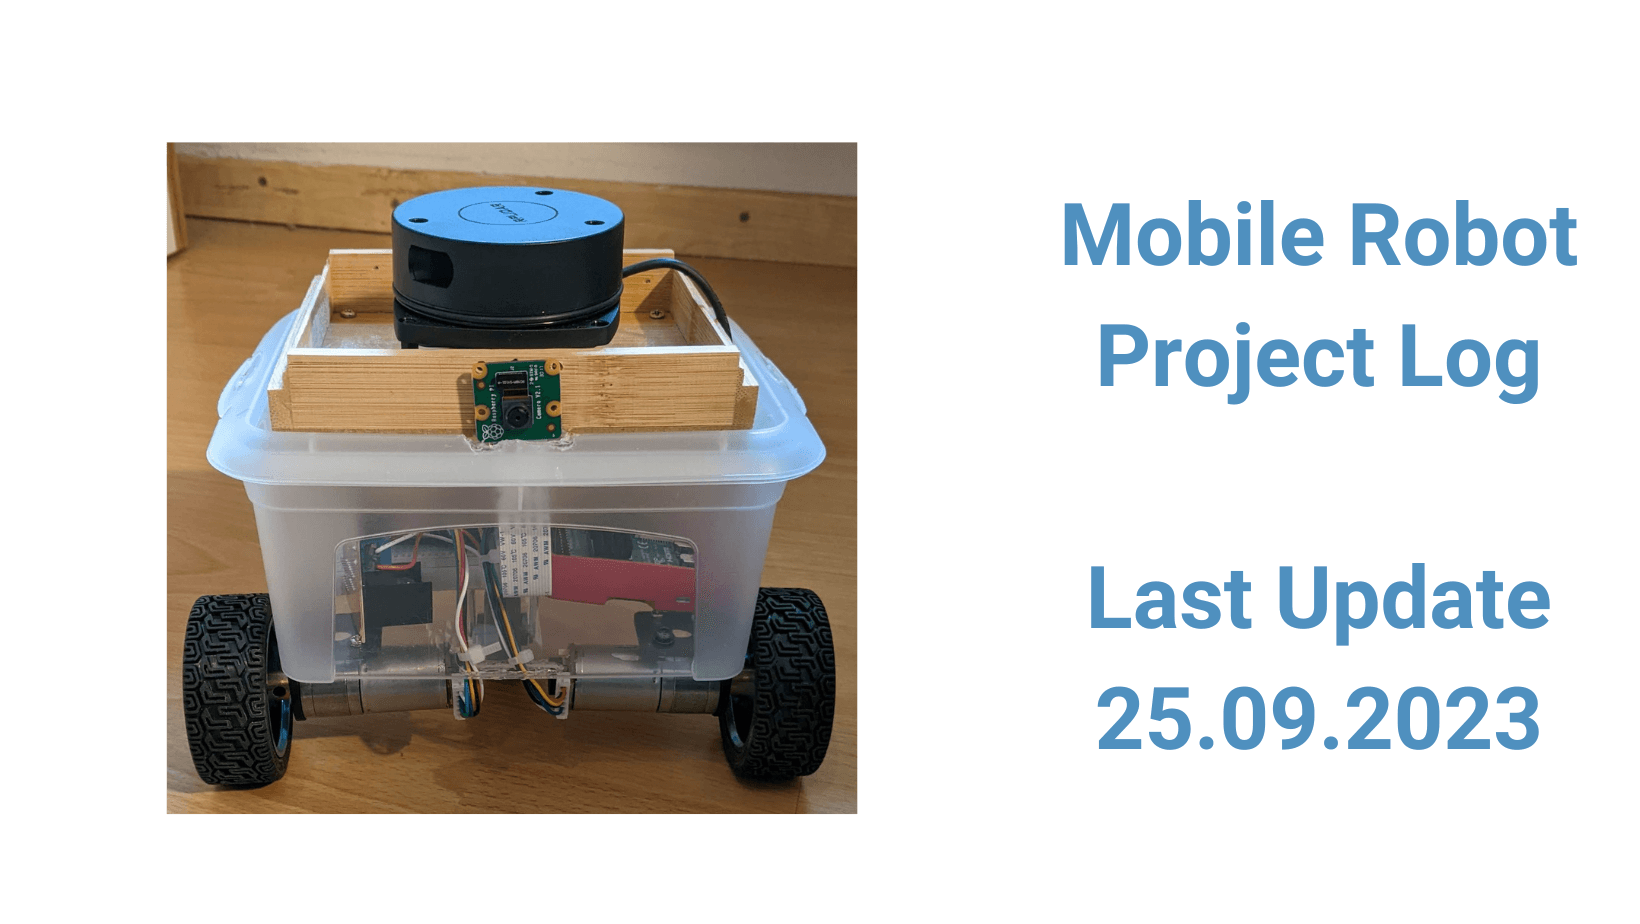
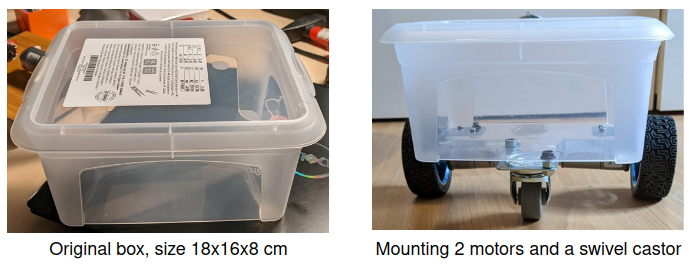
I have built the first prototype of the robot using a plastic box with a size (Length x Width x Height) of 18x16x8 cm. I mounted the two wheels and a furniture swivel castor under the box like below.
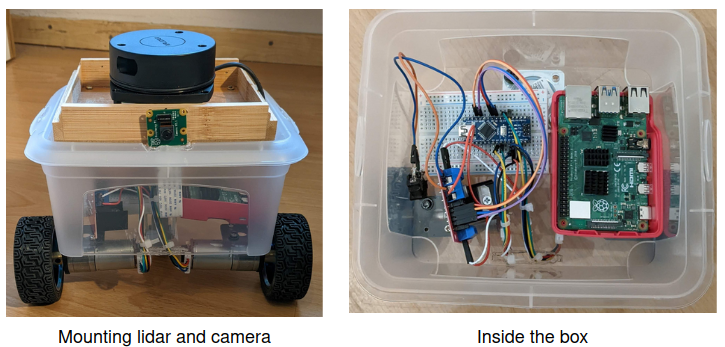
After that, I put the lidar and the Pi camera onto a wooden plate which is then mounted to the lid. All the other electronic parts are put inside the box. It looks a bit messy right now but I think it is fine for the first version.
Next, I will take a look into how to power the robot. Someone suggested using a LiPo battery or a power bank for the Pi plus a set of 8 AA batteries for the motor. I may try the latter first because I find it safer. The other thing I will do is to create a robot description (i.e. URDF) so that I can simulate it in ROS.
24 September 2023 - Access Pi Remotely
The last few months have been a bit tough for me because I have got a second daughter (Yay!), changed my job and moved to a new place. That's why, there is no progress on this project. Sorry for that. Things are getting better now so I will bit by bit continue. Hope you are still interested.
Since the Pi is attached to the mobile robot, accessing it via cable is not feasible anymore. Luckily, we can access the Pi remotely from another computer (the host). The easiest way is to access via SSH (Secure Socket Shell) using tools such as PuTTY or via VNC (Virtual Network Computing). I am using VNC Viewer because it provides access to a graphical user interface (GUI). Here is how to do it:
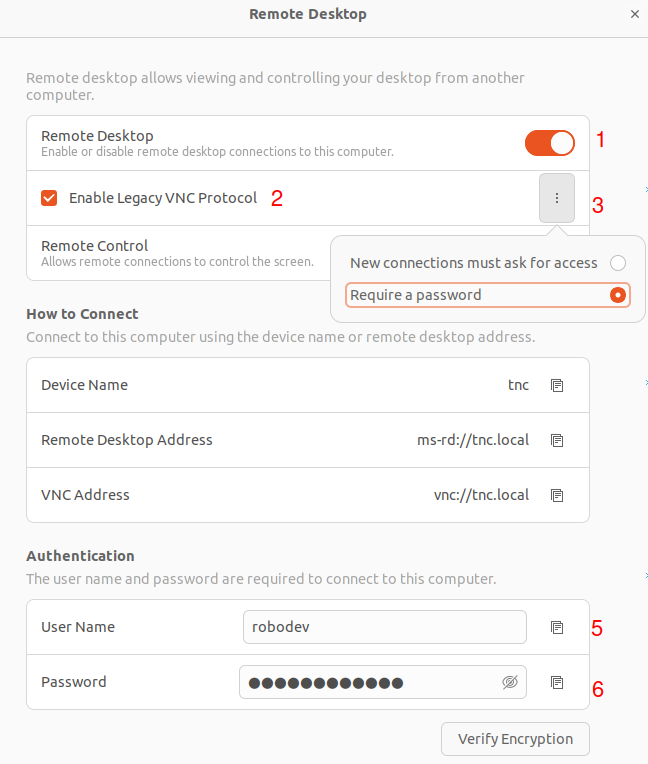
Step 2: In the Pi, open Settings or simply hit the Windows button and search for Sharing. Turn on the sharing and Go to Remote Desktop. Then follow the steps in the image below: Remote Desktop ON -> Enable Legacy VNC Protocol -> Choose Required a password -> Remote Control ON. Remember the password at the bottom. You can change the User Name and Password as you like but the password will be changed/regenerated every time you reboot the Pi. I will show you how to avoid it in Step 5.
Step 2: Find the IP address of the internet connection on the Pi by using the following command: hostname -I #captial i. Mine is 192.168.0.21.
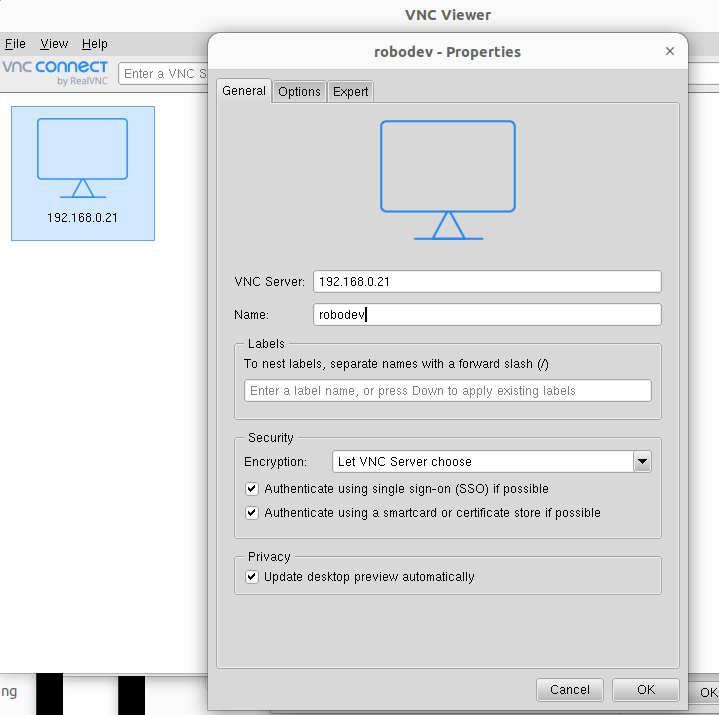
Step 3: Download and install VNC Viewer on your host PC. Mine is running Ubuntu 22 (VNC Viewer is available on Mac and Windows also). After installing, open VNC Viewer and enter the IP address from Step 2 plus a Name (name is optional). Hit OK to finish.
Step 4: After that, double-click on the robodev icon in the main VNC Viewer window and select Continue. Enter the password from Step 2. Hit OK and the GUI of the Pi should appear on the host PC.
Step 5: Now you can access the Pi from remotely. However, there are still some issues that you may encounter.
VNC only works when the Pi's display is active (meaning no sleep or screen saver), so we need to go to Power > Screen Blank > Never. You probably also want auto-login so that when you reboot your Pi you don't have to connect to a monitor to enter a password. So just go to Users -> Unlock … -> Enter Password -> Select Automatic Login.
By default, the remote desktop will automatically generate new authenticated password every time you reboot. To avoid that what you can do is (source): search for Passwords and Keys. On the Passwords tab on the left, remove vnc if it exists by right-clicking on it and selecting Delete. Then Right click on Login > select Change Password \> Enter your username password. Then it will ask you to enter a new password. DON'T type anything here and just click Continue twice. Then go back to Remote Desktop, ensure the password you want is set in Authentication part. Now each time you reboot, that password will then remain the same.