7. Write a ROS Publisher
You can start with the "HelloWorld" tutorial Writing a Simple Publisher and Subscriber (Python) on the ROS website but it will just print out "hello world" on your screen which is ... not very fun. Let's implement our "Photographer" from chapter 6. As a reminder, the Photographer represents a node for reading and publishing images from your webcam.
Setup Camera in VMWare
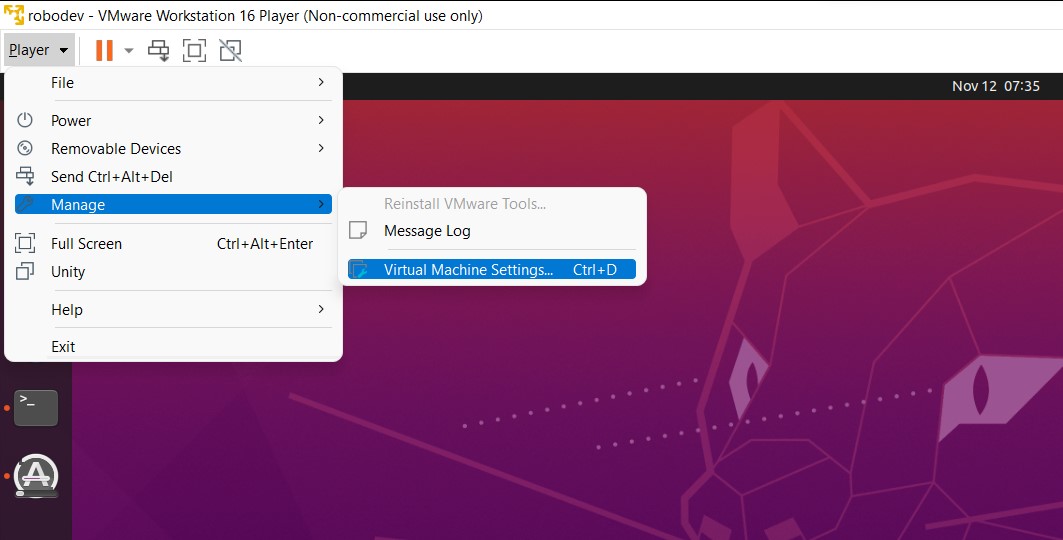
First, if you are using a virtual machine (VM), you need to make sure your webcam is connected to your VM instead of your host. In VMWare Workstation Player, go to Player > Manage > Virtual Machine Settings... or Ctrl + D.
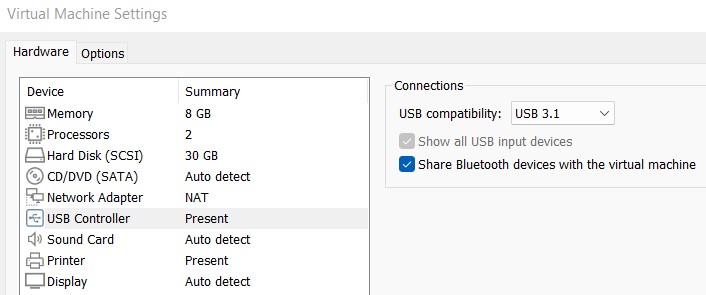
Select USB Controller tab and choose USB 3.1 in USB compatibility.
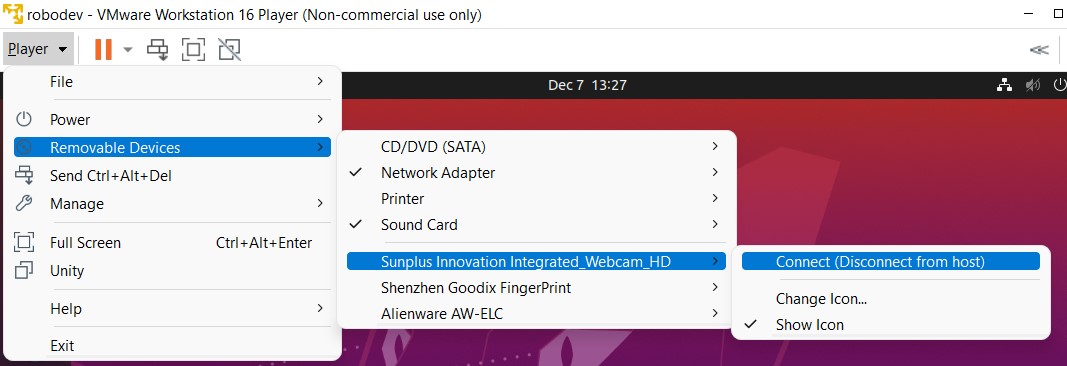
Then go to Removable Devices, select your integrated webcam (in my case it is Sunplus Innovation Integrated_Webcam_HD), and select Connect (Disconnect from host). Click OK on any popup dialogs after that.
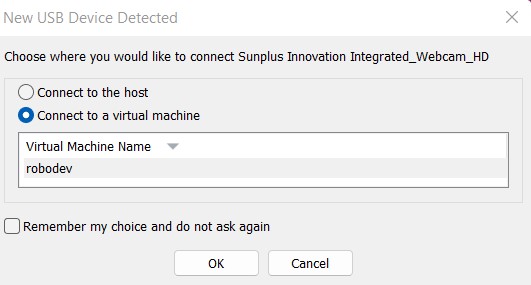
If there is an error saying something like the connection is unsuccessful, a trick is to switch your host machine (in my case Windows) and open your webcam by using the Camera app from Start. Return to the virtual machine and you should see a dialog to choose to connect the camera to your host or to your VM (see below). Select Connect to a virtual machine.
Finally, check if the connection is really established by going to Player > Removeable Devices again, and you should see a tick next to your webcam. If not, just redo the steps above.

Write a Camera Image Publisher
First, in the folder my_cam create a new Python script with the name image_publisher.py. The whole code is available here but I highly recommend you follow the explanation below and type it yourself.
The Code
#!/usr/bin/python3
import rospy
import cv2
from cv_bridge import CvBridge, CvBridgeError
from sensor_msgs.msg import Image

def publish_image():
    """Capture frames from a camera and publish it to the topic /image_raw
    """
    image_pub = rospy.Publisher("image_raw", Image, queue_size=10)
    bridge = CvBridge()
    capture = cv2.VideoCapture("/dev/video0")

    while not rospy.is_shutdown():
        # Capture a frame
        ret, img = capture.read()
        if not ret:
            rospy.ERROR("Could not grab a frame!")
            break
        # Publish the image to the topic image_raw
        try:
            img_msg = bridge.cv2_to_imgmsg(img, "bgr8")
            image_pub.publish(img_msg)
        except CvBridgeError as error:
            print(error)

if __name__=="__main__":
    rospy.init_node("my_cam", anonymous=True)
    print("Image is being published to the topic /image_raw ...")
    publish_image()
    try:
        rospy.spin()
    except KeyboardInterrupt:
        print("Shutting down!")
The Code Explained
The first line is called shebang line which defines where the interpreter is located. In this case, Python3, the default Python version in Ubuntu 20, is used and it is located in the folder /usr/bin.
#!/usr/bin/python3
All necessary libraries need to be imported. rospy is the Python API for creating ROS applications. cv2 is OpenCV, an open-source library for computer vision. Here we'll use it to capture images from our webcams. CvBridge is used to convert between ROS Image messages and OpenCV images since they are not the same data type. Finally, we have to import the Image message type (which belongs to the package sensor_msgs) because we are dealing with images.
import rospy
import cv2
from cv_bridge import CvBridge, CvBridgeError
from sensor_msgs.msg import Image
Next, define a function named publish_image. In this function, you first create a publisher which has a name ofimage_raw, a data type of Image that I mentioned above, and a queue_size of 10 (the size of the outgoing message queue used for asynchronous publishing). One example to understand queue_size is that if you publish images at a rate of 20 Hz (or 20 frames per second) but your queue_size is only set to 10 then only 10 images are processed (put into a queue) while the other 10 will be discarded. In our example, we actually don't have to care much about it since we have only one message Image. This is also a good article on how to select a proper queue size.
image_pub = rospy.Publisher("image_raw", Image, queue_size=10)
Create a CvBridge object:
bridge = CvBridge()
Define a video capture object which will help us to grab images from our webcam. /dev/video0 is the device name. If you use an external camera or on your computer, the name may be different, you can check it by using this command: ls -ltrh /dev/video*. In my case, it lists out both /dev/video0 and /dev/video1 but only /dev/video0 works.
capture = cv2.VideoCapture("/dev/video0")
We then jump into a loop that does the real job. The loop always checks if the node is running or not by checking the rospy.is_shutdown() flag. It breaks if there is an interruption, for example, you stop the program by using Ctrl + C. capture.read() returns a bool ret (True if the frame is read correctly, and false otherwise) and an image img. The image is encoded in OpenCV in the format of 3 channels Blue, Green, and Red (or BGR) and each channel is a matrix which is a 2-dimensional array. In the Appendix below, I explain in more detail how an image is encoded.
If the ret is false meaning there are some problems like the camera cannot be connected correctly, we throw out an error to the terminal. Before you can publish the image, you need to convert it to a ROS message img_msg using the function cv2_to_imgmsg (from CvBridge) with the color encoding "bgr8"(so that future subscribers will know the color order, in this case, it is blue-green-red and 8-bits). Finally, you can use the publisher image_pub that you created to publish img_msg using the function publish. If this does not work, just throw an exception.
    while not rospy.is_shutdown():
        # Capture a frame
        ret, img = capture.read()
        if not ret:
            rospy.ERROR("Could not grab a frame!")
            break
        # Publish the image to the topic image_raw
        try:
            img_msg = bridge.cv2_to_imgmsg(img, "bgr8")
            image_pub.publish(img_msg)
        except CvBridgeError as error:
            print(error)
The function publish_image is complete. In the main function, you first initialize a node called my_cam. Note that in ROS, nodes are uniquely named. If two nodes with the same name are launched, the previous one is kicked off. The flag anonymous is set True so that rospy will choose a unique name for our publisher node (by adding random numbers to the end of the name) so that multiple publishers can run simultaneously.
if __name__=="__main__":
    rospy.init_node("my_cam", anonymous=True)
    print("Image is being published to the topic /image_raw ...")
    publish_image()
    try:
        rospy.spin()
    except KeyboardInterrupt:
        print("Shutting down!")
After initializing the node, call the publish_image function. And the final step is to call rospy.spin() which simply keeps your node from exiting until the node has been stopped (by Ctrl + C for instance). And that's it! Your publisher code is ready to be run.
Run the Publisher
You first need to make it executable by either using the command
sudo chmod +x image_publisher.py
or right-click on the file, select Properties > Permissions > Allow executing files as program.

Then open 2 terminals or a terminator with 2 sub-terminals. In one, run roscore to start the ROS Master. In the other run, rosrun my_cam image_publisher.py in which my_cam is the package name and image_publisher.py is the script. Another way to run the publisher is by using roslaunch which I mention in the Appendix below.
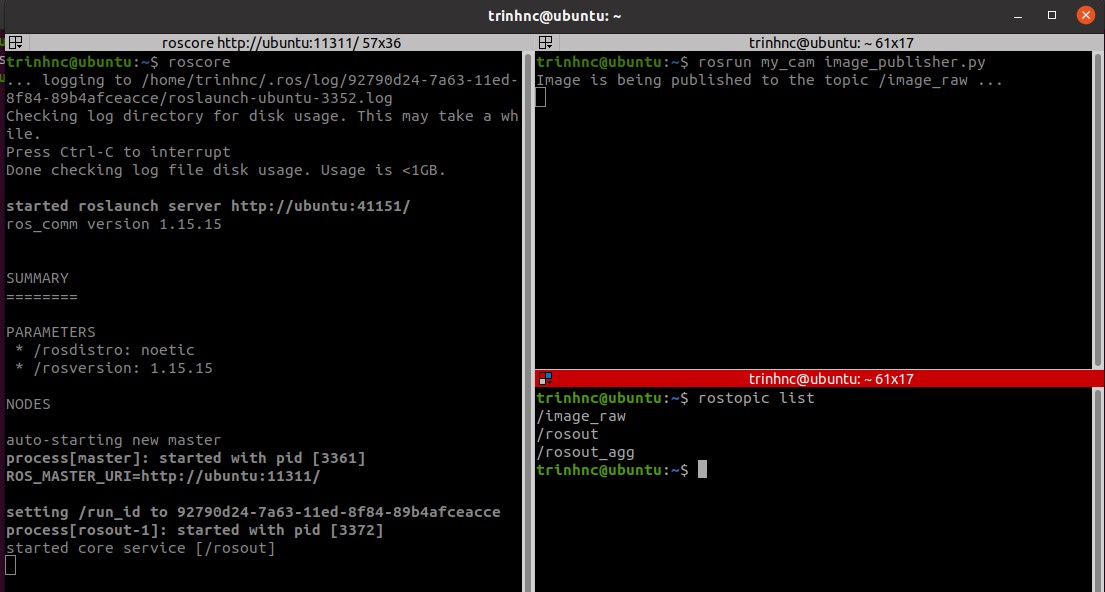
View Published Images
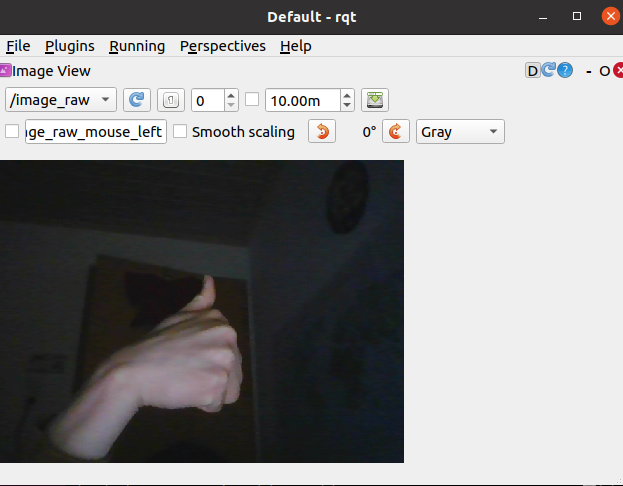
Now you should see the LED next to your webcam light on. And if you open another terminal and run: rostopic list, you should see the topic /image_raw listed. You can even see what's inside /image_raw by running this command: rostopic echo /image_raw and it will print out arrays of numbers that represent images. In order to display the images, you need to write a subscriber (i.e. the Photocopier) that we are going to do in the next chapter. Luckily, ROS already provides a tool for visualizing different types of published data including images. Run rqt in a terminal and a window will show up. Go to Plugins > Visualization > Image View, then select /image_raw in the drop-down topic list and you should see the live images.
Appendix
How a computer "see" an image
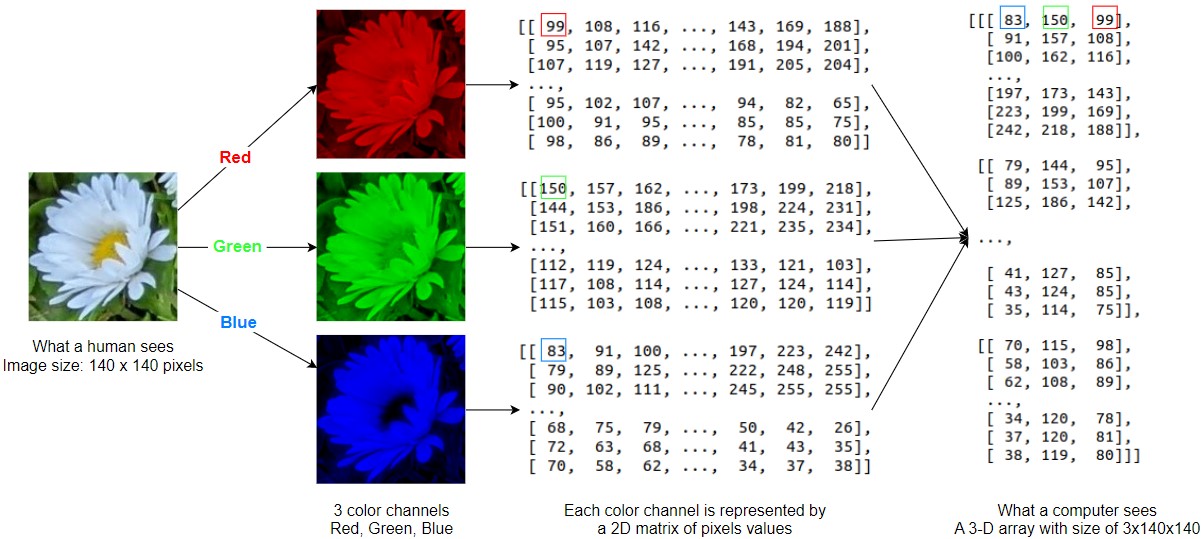
In computer vision, an image is usually represented by the RGB color model. RGB stands for Red, Green, and Blue, the 3 primary colors from which you can create any other colors.

Each color channel is encoded in a matrix (i.e. a 2-Dimensional array) whose values are pixels. If the pixels are in 8-bits, the values should be between 0 and 255 (or 2^8 - 1). In the example below, you can see how an image (with a height of 140 pixels and width of 140 pixels) is decomposed into 3 different channels and each channel is actually a 140x140 matrix. These channels are combined into a 3D matrix whose each element contains Blue, Green, Red pixels (this BGR order is the default color order of OpenCV and it could be different from other libraries).
Run Node with roslaunch
Besides rosrun, a more common way to run a node is by using roslaunch. Limitations of rosrun compared to roslaunch:
rosruncan only run one node from one package at a time whileroslaunchcan run multiple nodes from multiple packages.roslaunchautomatically startsroscore(if not already) whilerosrundoes not.To use
roslaunchrequires a .launch file and the user can customize this file such as calling other launch files, changing the variables of functions, etc. whilerosrundoes not have this option.
A launch file is actually an XML file, so it's pretty straightforward to create. First, create a folder named launch and then create a text file named my_cam.launch. The content of this file:
<launch>
     <arg name="camera_name" default="/dev/video0"/>
     <node name="my_webcam" pkg="my_cam" type="image_publisher_launch.py" output="screen">
         <param name="camera_name" type="string" value="$(arg camera_name)" />
     </node>
</launch>
Explanation: A launch file begins with the tag <launch> and ends with the tag </launch>. I begin with creating an argument named camera_name and its default value is /dev/video0. I will explain how to use it below. When you want to use this variable in the launch file, call it with $(arg camera_name) as in line 4. The next line defines the node that you want to run, where name is the name of the Node (this name will overwrite the name you use in your code if the two names are different), pkg is the package name (here my_cam), type is the filename (here image_publisher_launch.py), output is for choosing how to display the information (if screen, the information will be printed to the screen, and if log, it will be saved in a log file). Finally, create a parameter named camera_name with type string and value the same as the argument camera_name above. You can call this parameter in your code and so you don't have to edit the code every time you need to change something. Concretely, I created a file image_publisher_launch.py. This is very similar to image_publisher.py except that I made it a class and when initializing the class, there is the line:
self.capture = cv2.VideoCapture(rospy.get_param("my_webcam/camera_name"))
Here instead of giving a default value as before, the rospy.get_param function is used to get parameters from the launch file. So if for example, you use a camera with a different name, then you just need to change the launch file. Or when running roslaunch you can use the argument "camera_name" like below.
roslaunch my_cam my_cam.launch camera_name:="/dev/video0"
If you use default values of variables (here "/dev/video0"), you can simply run roslaunch my_cam my_cam.launch. But as I said, if you use a different camera or its name is not /dev/video0 then you just need to change the name in the command above. Very convenient, right?
In addition, there are many other tags that I can't list here. You can check them here and here.
Reference
- Cover image: http://wiki.ros.org/hydro