8. Write a ROS Subscriber
In this part, you are going to implement an image subscriber which is "the Photocopier" in my example. This subscriber is simply continuously reading images from the topic image_raw (that you created from chapter 7 and displaying them on your screen. Of course, you can do much more than just view the images (like putting the images to some machine learning algorithms that you are going to do in the next chapter) or you can even view the image right from the publisher itself but we should start somewhere, right? This image subscriber (and publisher) is only an example to show you how different processes in ROS communicate with each other.
The Code
Let's create a new Python script in the my_cam folder and name it image_subscriber.py. If you already did the last chapter, the code below should look familiar because the structure is quite the same. Again, I highly recommend you follow the explanation part below and type by yourself instead of copy&paste.
#!/usr/bin/python3

import rospy
import cv2
from cv_bridge import CvBridge, CvBridgeError
from sensor_msgs.msg import Image

def callback(image_msg):
    """This function is called to handle the subscribed messages

    Args:
        image_msg (Image): message type Image from sensor_msgs
    """
    try:
        cv_image = bridge.imgmsg_to_cv2(image_msg)
        cv2.imshow('ROS Image Subscriber', cv_image)
        cv2.waitKey(10)
    except CvBridgeError as error:
        print(error)

if __name__=="__main__":
    bridge = CvBridge()
    rospy.init_node("image_subscriber", anonymous=True)
    print("Subscribe images from topic /image_raw ...")

    image_subcriber = rospy.Subscriber("image_raw", Image, callback)

    try:
        # spin() simply keeps python from exiting until this node is stopped
        rospy.spin()
    except KeyboardInterrupt:
        print("Shutting down!")
The Code Explain
The first part of the code is exactly the same as in the image_publisher.py. It is basically to import all the necessary libraries.
#!/usr/bin/python3

import rospy
import cv2
from cv_bridge import CvBridge, CvBridgeError
from sensor_msgs.msg import Image
Next, a callback function is created but I want to explain first the main function and come to this callback later. In the main, similar to the publisher, you need to create a CvBridge object and initialize a node whose name is "image_subscriber".
if __name__=="__main__":
    bridge = CvBridge()
    rospy.init_node("image_subscriber", anonymous=True)
    print("Subscribe images from topic /image_raw ...")
Then, the subscriber is created by using the function rospy.Subscriber("image_raw", Image, callback) in which image_raw is the topic you want to subscribe to, Image is the data type of image_raw and callback is a function that will be invoked when new messages are received. Finally, rospy.spin() is called to keep your node from exiting until the node has been stopped (by Ctrl + C for instance).
    image_subcriber = rospy.Subscriber("image_raw", Image, callback)
    try:
        # spin() simply keeps python from exiting until this node is stopped
        rospy.spin()
    except KeyboardInterrupt:
        print("Shutting down!")
The callback function is defined always with the incoming message as the first argument.
def callback(image_msg):
Inside the callback, you first convert the ROS image message image_msg to OpenCV format (here I named it cv_image) using the imgmsg_to_cv2 function. Then, you can display the image using the cv2.imshow function which takes first the window name (here ROS Image Subscriber) as the first argument and the image cv_image as the second. Finally, cv2.waitKey(10) is used to delay for given milliseconds (here 10ms) or until any key is pressed before switching to the next frame.
    try:
        cv_image = bridge.imgmsg_to_cv2(image_msg)
        cv2.imshow('ROS Image Subscriber', cv_image)
        cv2.waitKey(10)
    except CvBridgeError as error:
        print(error)
Run the Subscriber
In order to start the script above from a terminal, you should make it executable by either right-click on the script and selecting Properties > Permissions and check Allow executing file as program, or using the command sudo chmod +x image_subscriber.py. Then, open 3 terminals or one terminator with 3 sub-terminals as below.
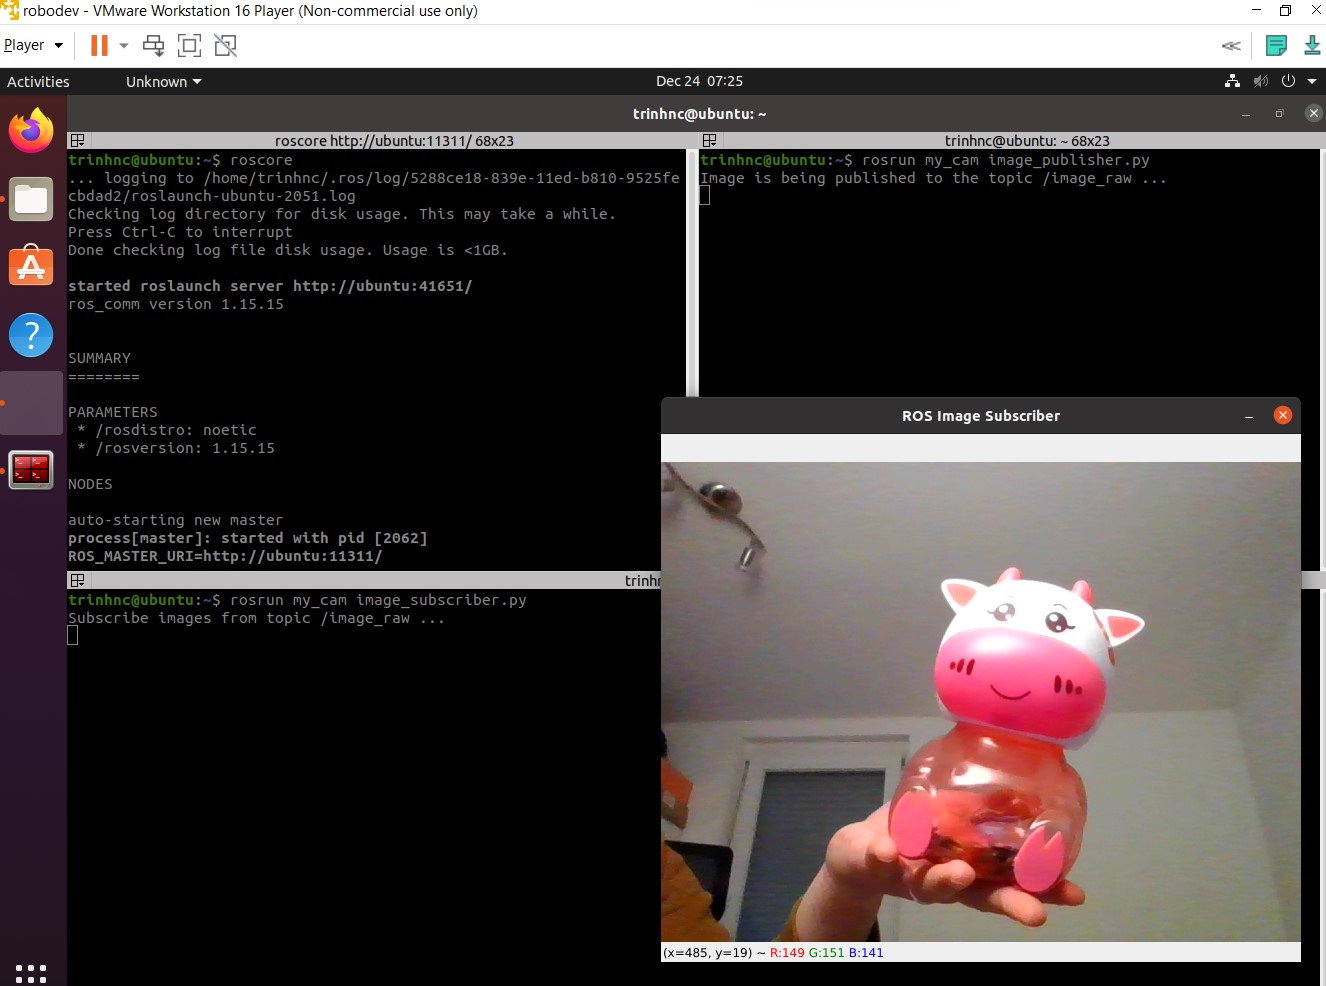
In the first terminal, run ROS Master
roscore
In the second, start the publisher (remember to connect the webcam to your virtual machine).
rosrun my_cam image_publisher.py
In the third, start the subscriber:
rosrun my_cam image_subscriber.py
After that, you should see a window with the title ROS Image Subscriber showing your webcam view like what I have in the photo above (the cute cow is actually one of my assistants :)).
After completing chapters 7 and 8, you now know how to write a ROS publisher and subscriber. You also know how to exploit the images from a camera which is one of the most popular sensors used in robotics. Well done! In the next chapter, as promised, I will help you use one of the available tools to deploy the images and get some useful information instead of just viewing them on screen. Meet you there!
Reference
- Cover photo: http://wiki.ros.org/jade